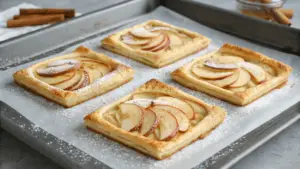
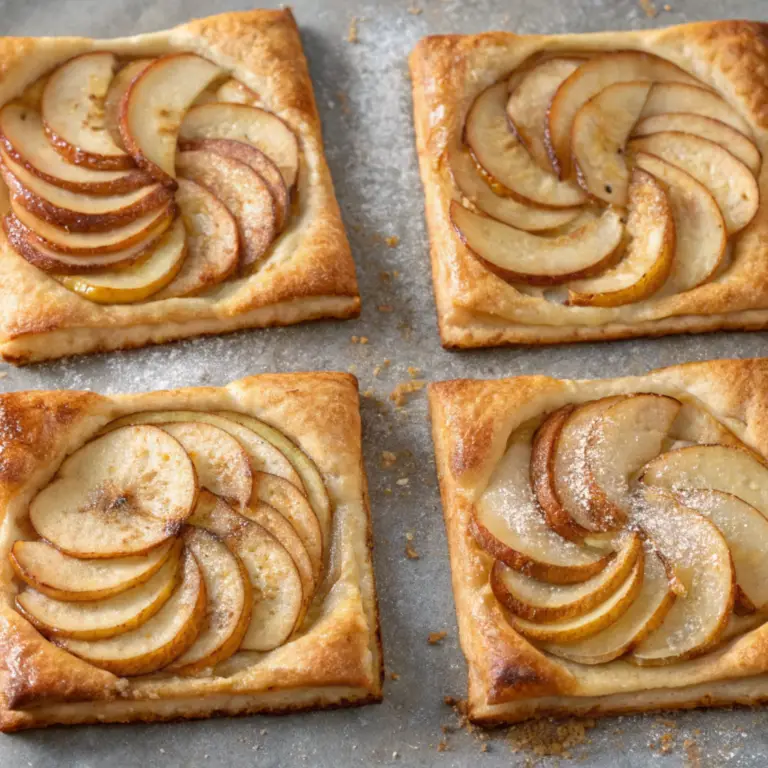
Apple puff pastry is a classic dessert that combines the natural sweetness of apples with the buttery flakiness of puff pastry. This mouthwatering dessert is just what you need to curb your cravings for something sweet, impressing guests, or enjoying a comforting snack. In this article, we’ll dive into everything you need to know about making Apple Pastry, from understanding its key ingredients to mastering the art of preparation. Let’s begin with Part 1, where we’ll explore what makes this dessert irresistible.
Understanding Apple Puff Pastry
What is Apple Puff Pastry?
At its core, apple puff pastry is a delightful blend of crisp, golden layers of puff pastry wrapped around a warm, spiced apple filling. The light and airy texture of the pastry complements the tender, juicy apples perfectly, creating a dessert that’s as visually appealing as it is mouthwatering. With its balance of sweetness and buttery richness, this dish can be as simple or sophisticated as you desire.
Key Ingredients for Perfect Apple Puff Pastry
To create the ultimate apple puff pastry, you’ll need just a handful of quality ingredients:
- Puff Pastry Sheets: Pre-made puff pastry is a lifesaver for quick preparation. Look for all-butter varieties for the best flavor and texture.
- Apples: Opt for firm and slightly tart apples like Granny Smith or Honeycrisp to balance the sweetness of the filling.
- Spices: Cinnamon, nutmeg, and cloves are the traditional spices that bring warmth and depth to the dish.
- Sweeteners: A mix of brown sugar and granulated sugar enhances the caramel-like flavor of the apples.
- Butter: A touch of butter helps caramelize the apples for a rich filling.
- Egg Wash: Beaten eggs create that glossy, golden finish on the pastry.
Why You’ll Love Apple Puff Pastry
There are countless reasons to love apple puff pastry. It’s incredibly versatile—you can serve it as a dessert, brunch, or teatime snack. The recipe is also easily adaptable; you can experiment with fillings, shapes, and presentations to suit your taste and occasion. Plus, the fresh fruit and delicate pastry make it feel both indulgent and wholesome.
Preparing Apple Puff Pastry
Step 1: Prepping the Ingredients
To make the perfect apple puff pastry, preparation is key. Begin by gathering all your ingredients:
- Thaw the Puff Pastry: If using store-bought puff pastry, let it thaw in the fridge for a few hours or on the counter for about 20-30 minutes until it’s pliable but still cool.
- Peel and Slice the Apples: Peel your apples and slice them thinly for even cooking. Uniform slices ensure every bite is full of tender, flavorful filling.
- Mix the Spices: In a small bowl, combine cinnamon, nutmeg, and a pinch of ground cloves. Add the sugars to this mixture and stir well.
Step 2: Cooking the Apple Filling
Cooked apples bring out the natural sweetness and create a luscious filling for your apple puff pastry. Here’s how to do it:
- Heat a Skillet: Add a small pat of butter to a skillet and let it melt over medium heat.
- Cook the Apples: Toss in your sliced apples and sprinkle the spice-sugar mixture evenly over them. Stir occasionally and cook for 5-7 minutes until the apples soften slightly but retain some bite.
- Cool the Filling: Remove the cooked apples from the heat and let them cool completely. This step is important to prevent the puff pastry from becoming soggy.
Step 3: Rolling and Cutting the Pastry
Once your filling is ready, it’s time to prepare the pastry:
- Roll Out the Dough: Lightly flour your work surface and gently roll out the puff pastry to smooth any creases.
- Cut the Pastry: Depending on your desired shape, cut the pastry into squares, rectangles, or circles. Ensure each piece is large enough to enclose the apple filling.
Assembling and Baking Apple Puff Pastry

Filling and Sealing
Assembling your apple puff pastry is where the magic starts coming together:
- Add the Filling: Place a spoonful of the cooled apple mixture in the center of each pastry piece.
- Seal the Edges: Fold the pastry over the filling (into a triangle, rectangle, or half-moon shape). Press the edges with a fork to seal them tightly, preventing the filling from oozing during baking.
Step 2: Adding Finishing Touches
Make your Apple Pastry extra special with these final steps:
- Brush with Egg Wash: Beat an egg and brush it over the top of each pastry. This will give your pastries a golden, glossy finish.
- Sprinkle Sugar: Add a light dusting of coarse sugar on top for extra crunch and sweetness.
Step 3: Baking to Perfection
Now, it’s time to bake your creations:
- Preheat the Oven: Heat your oven to 400°F (200°C) and line a baking sheet with parchment paper.
- Bake the Pastries: Arrange the pastries on the sheet, leaving space between each one. Bake for 15-20 minutes until they puff up and turn golden brown.
- Cool and Serve: Let the pastries cool slightly before serving. They’re best enjoyed warm, straight out of the oven!
Variations of Apple Puff Pastry
Sweet Variations
- There’s no shortage of creative ways to adapt the classic apple Pastry recipe. Here are some fun ideas to try:
- Apple-Cinnamon Turnovers: Shape your puff pastry into triangles and drizzle them with a simple powdered sugar glaze after baking. They’reThey’re portable and perfect for a quick treat!
- Caramel Apple Pastries: Add a drizzle of caramel sauce to the filling before sealing the pastry. The caramel melts into the apples for an extra indulgent dessert.
- Apple Puff Pastry Tart: Lay out a sheet of puff pastry, top it with thinly sliced apples arranged in a pattern, and bake until golden. A sprinkle of powdered sugar adds the finishing touch.
Savory Options
- While apple puff pastry is typically a sweet dish, you can create savory versions for adventurous palates:
- Apple and Brie Pastries: Combine sliced apples with creamy Brie cheese. The contrast between sweet and savory is utterly delicious.
- Apple, Bacon, and Cheddar Tarts: Layer apples, cooked bacon, and shredded cheddar on puff pastry for a hearty appetizer or snack.
Serving and Storing Apple Puff Pastry
Serving Suggestions
- Apple puff pastry is best served warm at its flakiest, and the filling is delightfully gooey. Here are some ways to enhance your presentation:
- With Ice Cream: A scoop of vanilla ice cream pairs beautifully with warm apple puff pastry. The creaminess complements the pastry’spastry’s crisp texture.
- Topped with Whipped Cream: Light and fluffy whipped cream is a classic choice for a simple, elegant dessert.
- Drizzled with Sauces: Caramel or chocolate sauce takes this treat to the next level. Add a sprinkle of chopped nuts for crunch.
Storing and Reheating
- To make the most of your Apple Pastry , proper storage is essential:
- Storing Leftovers: Keep leftover pastries in an airtight container at room temperature for up to two days. For more extended storage, refrigerate them for up to four days.
- Reheating Tips: Reheat pastries in an oven or toaster oven at 350°F (175°C) for 5-7 minutes to restore their crisp texture. Avoid using a microwave, as it may make the pastry soggy.
- For more delicious recipes, check out this easy pancake breakfast casserole recipe. It’s a fantastic addition to any brunch menu and pairs well with your favorite sweet treats!
Tips for Perfect Apple Puff Pastry Every Time
Mastering the Puff Pastry
Achieving flaky, golden perfection in your apple puff pastry requires attention to detail. Here are a few essential tips to keep in mind:
- Keep It Cold: Puff pastry works best when it’s cold. If it warms up too much, pop it back into the fridge for a few minutes before working with it.
- Don’tDon’t Overfill: While it’s tempting to pile on the apples, too much filling can make the pastry soggy or hard to seal. Stick to a moderate amount for best results.
- Use Parchment Paper: Baking on parchment paper prevents sticking and makes cleanup a breeze.
Enhancing Flavors
The flavor of your apple puff pastry can be elevated with minor tweaks:
- Add Lemon Juice: Tossing the apple slices with a bit of lemon juice before cooking adds brightness and balances the sweetness.
- Experiment with Spices: Try adding cardamom, allspice, or ginger to the mix for a unique flavor twist.
- Layer with Jam: Spread a thin layer of apricot or raspberry jam on the pastry before adding the apple filling for extra sweetness and a hint of tartness.
Why You’ll Love Making Apple Puff Pastry
Easy to Make Yet Impressively Elegant
One of the best things about apple puff is how effortlessly it comes together. With pre-made puff pastry and a few pantry staples, you can create a dessert that looks like it came from a bakery. Plus, the process is straightforward, making it a fun and rewarding recipe for bakers of all skill levels.
Perfect for Any Occasion
Whether hosting a dinner party, enjoying a casual brunch, or simply treating yourself, apple puff pastry fits the bill. Its versatility lets you dress it up for formal occasions or keep it simple for a cozy family dessert. The combination of flaky pastry and tender apples is universally loved, making it a guaranteed crowd-pleaser.
Common Mistakes to Avoid When Making Apple Puff Pastry
Overloading the Pastry
Adding too much filling is one of the most common pitfalls in making apple puff pastry. While it’s tempting to pile on the delicious apple mixture, overfilling can lead to:
- Soggy Pastry: Too much moisture from the filling can seep into the pastry, ruining its signature flakiness.
- Sealing Issues: Excess filling makes it difficult to seal the edges, causing leaks during baking.
To avoid this, use just enough filling to cover the pastry without overstuffing, and ensure the edges are sealed tightly with a fork.
Skipping the Egg Wash
The egg wash might seem optional, but it’s crucial for achieving that golden, bakery-perfect finish. Without it, your Apple Pastry may look dull and less appealing. Always brush a light layer of beaten egg over the top before baking for a glossy, professional look.
Ignoring Cooling Time
Patience pays off when working with puff pastry. Whether it’s letting the dough thaw correctly or allowing the filling to cool before assembly, skipping these steps can lead to a less-than-ideal texture. Cooling ensures the pastry remains crisp and prevents it from becoming soggy.
Frequently Asked Questions About Apple Puff Pastry
Can I Use Different Fruits?
Absolutely! While apple puff pastry is a classic, you can easily swap apples for other fruits like pears, peaches, or berries. Just make sure to adjust the cooking time and sweetness to match the fruit’sfruit’s natural flavor.
How Can I Make It Ahead of Time?
To save time, you can prepare apple puff pastry in advance. Here’sHere’s how:
- Prepare and Freeze: Assemble the pastries and freeze them on a baking sheet until firm. Transfer to a freezer bag for storage.
- Bake from Frozen: When ready to bake, place the frozen pastries on a parchment-lined baking sheet and bake as directed, adding 5-10 minutes to the cooking time.
What If I Don’t Have Puff Pastry?
If you can’t find puff pastry, use phyllo dough as a substitute. Layer several sheets of phyllo, brushing each with melted butter before adding the filling. The result will be lighter and crispier but still delicious!
With these insights, you can avoid common mistakes and customize your apple puff pastry to suit your preferences. Enjoy experimenting with this versatile and crowd-pleasing treat!
Print
Apple Puff Pastry
- Prep Time: 20 minutes
- Cook Time: 20 minutes
- Total Time: 40 minutes
- Yield: 8 pastries
- Category: Dessert
- Method: Baking
- Cuisine: American, European
Ingredients
- Puff Pastry Sheets (store-bought or homemade) – 1 package (2 sheets), thawed
- All-purpose Flour – For dusting the surface
For the Filling
- Apples – 2-3 medium-sized (Granny Smith or Honeycrisp work best), peeled, cored, and thinly sliced
- Brown Sugar – 1/4 cup
- Granulated Sugar – 2 tablespoons
- Cinnamon – 1 teaspoon
- Nutmeg – 1/4 teaspoon
- Cloves – A pinch (optional)
- Lemon Juice – 1 tablespoon (to prevent the apples from browning and to add a hint of tartness)
- Butter – 1 tablespoon, for cooking the apple filling
For Assembly
- Egg – 1, beaten (for egg wash)
- Coarse Sugar (optional) – For sprinkling on top for added texture and sweetness
Optional Toppings (for Serving)
- Caramel Sauce – For drizzling
- Powdered Sugar – For dusting
- Vanilla Ice Cream – As a side for a warm pastry
Instructions
Step 1: Prepare the Apples
- Peel and Slice: Start by peeling, coring, and slicing the apples into thin, even pieces.
- Mix the Filling: In a mixing bowl, combine the sliced apples with brown sugar, granulated sugar, cinnamon, nutmeg, cloves (if using), and lemon juice. Stir until the apples are well coated.
Step 2: Cook the Apple Filling
- Heat the Butter: In a skillet over medium heat, melt the butter.
- Cook the Apples: Add the prepared apple mixture to the skillet. Cook for 5-7 minutes, stirring occasionally, until the apples soften slightly but still hold their shape. Remove from heat and let the filling cool completely.
Step 3: Prepare the Puff Pastry
- Thaw and Roll Out: If using store-bought puff pastry, ensure it’s thawed. Lightly flour your work surface and gently roll out the pastry sheets to smooth any creases.
- Cut the Pastry: Use a knife or pizza cutter to divide the pastry into equal squares, rectangles, or circles, depending on your preferred shape.
Step 4: Assemble the Pastries
- Add the Filling: Place a spoonful of the cooled apple filling in the center of each pastry piece.
- Seal the Edges: Fold the pastry over the filling (e.g., into a triangle or rectangle). Press the edges with a fork to seal tightly.
- Add the Egg Wash: Brush the top of each pastry with beaten egg for a golden finish.
- Sprinkle Sugar (Optional): Sprinkle coarse sugar on top for added crunch and sweetness.
Step 5: Bake the Pastries
- Preheat the Oven: Set your oven to 400°F (200°C) and line a baking sheet with parchment paper.
- Bake: Arrange the pastries on the baking sheet, leaving space between each. Bake for 15-20 minutes, or until the pastries are puffed and golden brown.
Step 6: Cool and Serve
- Cool Slightly: Allow the pastries to cool on a wire rack for 5-10 minutes.
- Add Toppings (Optional): Dust with powdered sugar or drizzle with caramel sauce.
- Serve Warm: Pair with a scoop of vanilla ice cream for an extra treat.
Nutrition
- Serving Size: 1 pastry
- Calories: 220 kcal
- Sugar: 12 g
- Sodium: 150 mg
- Fat: 12 g
- Saturated Fat: 6 g
- Unsaturated Fat: 5 g
- Trans Fat: 0 g
- Carbohydrates: 25 g
- Fiber: 2 g
- Protein: 3 g
- Cholesterol: 25 mg

